Hello, and welcome to the Angry Birds Wiki! A place where you could find or share information about the Angry Birds and Bad Piggies series. Before editing, take note of the following:
You can go to our Community Portal to get a quick start about us and what you can do to help!
Per our image policy, any non-official or non-Angry Birds/Bad Piggies images must be added to said user's profile page, or else they may be deleted. If you are the artist yourself, you must select the "I created this image myself" ( {{Self}} template ) option when uploading.
Please make sure you do not post fanon material in our mainspace articles. For more info, go here.
Click here to create your userpage. Add some Userboxes to tell everyone about yourself!
Got any questions? Feel free to contact an administrator or a moderator for help.
Click here to learn more about the wiki's history.
The Angry Birds Wiki is happy to welcome you to the community and happy editing!
Moorlands - 2 is the second level of Moorlands. At wave 3 in this level, you will fight with the huge Brawler in the boss version. He just like Big Pirate and Big Sailor, only stronger and have 10% chance to stun you for a turn.
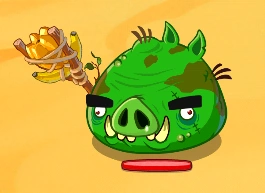
Wilding - Passive: Gains bonus attack power while the Rage Chili fills up.
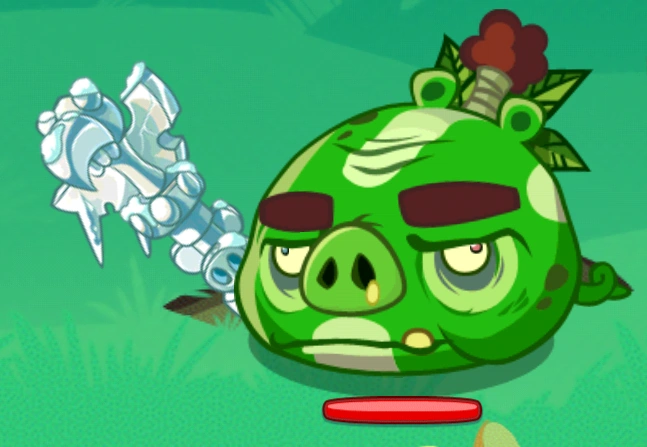
Frost Hog
2085
Shattering Blow - Charge: 3 turns. Deals 327 damage. Target also takes 65 damage per turn for the next 3 turns.
Wilding - Passive: Gains bonus attack power while the Rage Chili fills up.
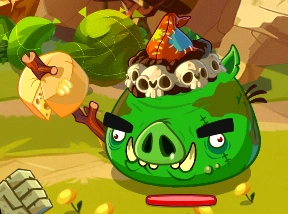
Wave 3
Brawler (Boss)
3892
Huge Haymaker - Charge: 2 turns. Deals 218 damage to all enemies. 10% chance to stun target for 1 turn.
Wilding - Passive: Gains bonus attack power while the Rage Chili fills up.
Strategy
Warning: On the first wave, don't use the Rage Chili to anyone. From wave 2, anytime, use the Rage Chili to Matilda if the birds' healths are under 65% or for Red if otherwise.
Choose Red in Samurai, Matilda in Druid and Bomb in Cannoneer (if you have Berserk, use it!). In every waves, attack every turn with The Blues and Bomb, then, heal with Matilda if the birds' health is not full, otherwise, attack with her. When, the Rage Chili is full, do as what we said at the "Warning". Then, you need to activate Red's secondary skill when Brute, Frost Hog or Brawler is about to attack! Repeat this over and over until you win the entire battle or lose the entire battle.
Strange Site - 1 ·Strange Site - 2 ·Strange Site - 3 ·Strange Site - 4 ·Strange Site - 5 ·Strange Site - 6 ·Strange Site - 7 ·Strange Site - 8 ·Strange Site - 9 ·Strange Site - 10
Pig Lair
Pig Lair - 1 ·Pig Lair - 2 ·Pig Lair - 3 ·Pig Lair - 4 ·Pig Lair - 5 ·Pig Lair - 6 ·Pig Lair - 7 ·Pig Lair - 8 ·Pig Lair - 9 ·Pig Lair - 10
The Great Divide - 1 ·The Great Divide - 2 ·The Great Divide - 3 ·The Great Divide - 4 ·The Great Divide - 5 ·The Great Divide - 6 ·The Great Divide - 7 ·The Great Divide - 8 ·The Great Divide - 9 ·The Great Divide - 10
Hog Head Hollow - 1 ·Hog Head Hollow - 2 ·Hog Head Hollow - 3 ·Hog Head Hollow - 4 ·Hog Head Hollow - 5 ·Hog Head Hollow - 6 ·Hog Head Hollow - 7 ·Hog Head Hollow - 8 ·Hog Head Hollow - 9 ·Hog Head Hollow - 10
Pirate Bay - 1 ·Pirate Bay - 2 ·Pirate Bay - 3 ·Pirate Bay - 4 ·Pirate Bay - 5 ·Pirate Bay - 6 ·Pirate Bay - 7 ·Pirate Bay - 8 ·Pirate Bay - 9 ·Pirate Bay - 10
 Brute
Brute

 Cave Shaman


 Frost Hog
 Brawler (Boss)
")
")
")
